
Deploying Data Apps with Flask, Github and Heroku
Here, in this blog post, we will be able to deploy our own fully functional, public-facing web app. The main objective of doing this is to showcase our own data science skills to employers or to business investors. This not only gives you valuable experience dynamically fetching and displaying data, but also encourages you to think about end user interaction. To demo the process, I decided to marry together some of my favorite technologies:
- Flask, a slick web framework for Python
- Heroku for cloud-based app deployment
- Github a web-based Git repository hosting service for version control and distributing code
Building the app
We’re going to be building our app in Flask, and all we need are some barebones forms, redirects, and HTML templates to collect the user input and display the desired information.
Firstly, creating the app.py and writing the python script given as below:
	from flask import Flask, render_template, request, redirect

	app = Flask(__name__)

	@app.route('/')
	def main():
	  return redirect('/index')

	@app.route('/index')
	def index():
	  return render_template('index.html')

	if __name__ == '__main__':
	  app.run(debug=True)
Then, in index.html, we will write simple html code template for just printing "Hello, World!" message on webpage, given as below:
	<html>
	  <head>
		<title> Hello, World! </title>
	  </head>
	  <body>
		<div>
		  <h1>Hello, World!</h1>
		</div>
	  </body>
	</html>
In this way, we are able to write code our first flask webapp.
Publishing to the web
Heroku fully supports Python apps.
We can specify a Python runtime as well as take advantage of
gunicorn‘s concurrent request processing by modifying the
Procfile according to what process types we want to use:
web: gunicorn app:app Of course, we’ll also need to manage our dependencies so that Heroku knows where to find gunicorn, Jinja2, and everything else we’re using. As we’ve done more development in Python, we’ve come to appreciate Conda as an alternative package manager to the ubiquitous pip.
Now, writing three more text files named as below:
- runtime.txt
- requirements.txt
- conda-requirements.txt
These files are necessary to deploy webapp on heroku, because in these files, we would mentioned Python version, Flask package or other more packages that our webapp will use.
Now, put all files into a webapp-demo folder and upload it into github site, which will show as below:
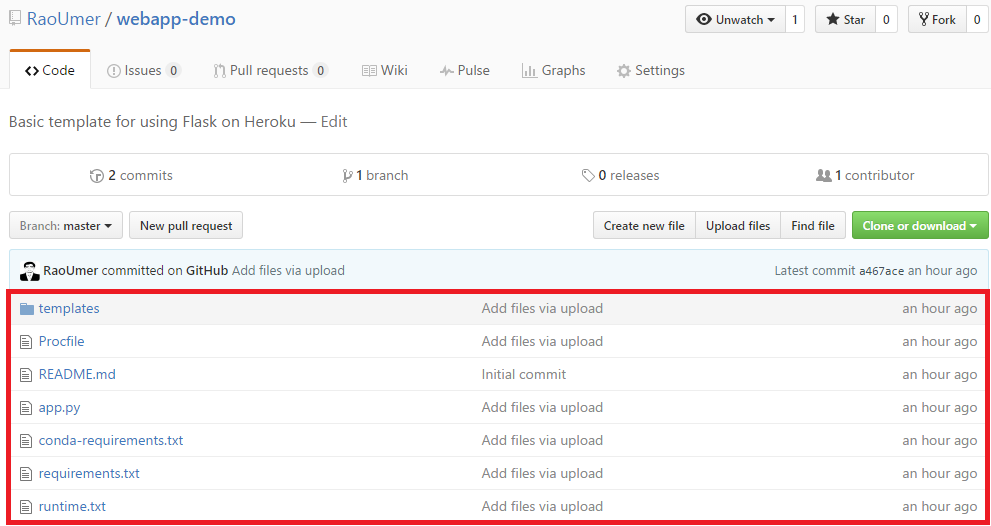
Now, here is the step-by-step process to deploy the webapp on Heroku. In Heroku, there are three methods to deploy your apps, which are as Heroku Git, Github and Dropbox.
I will deploy my webapp through Github method. Please, follow these steps to deploy your webapp on Heroku, as given below:
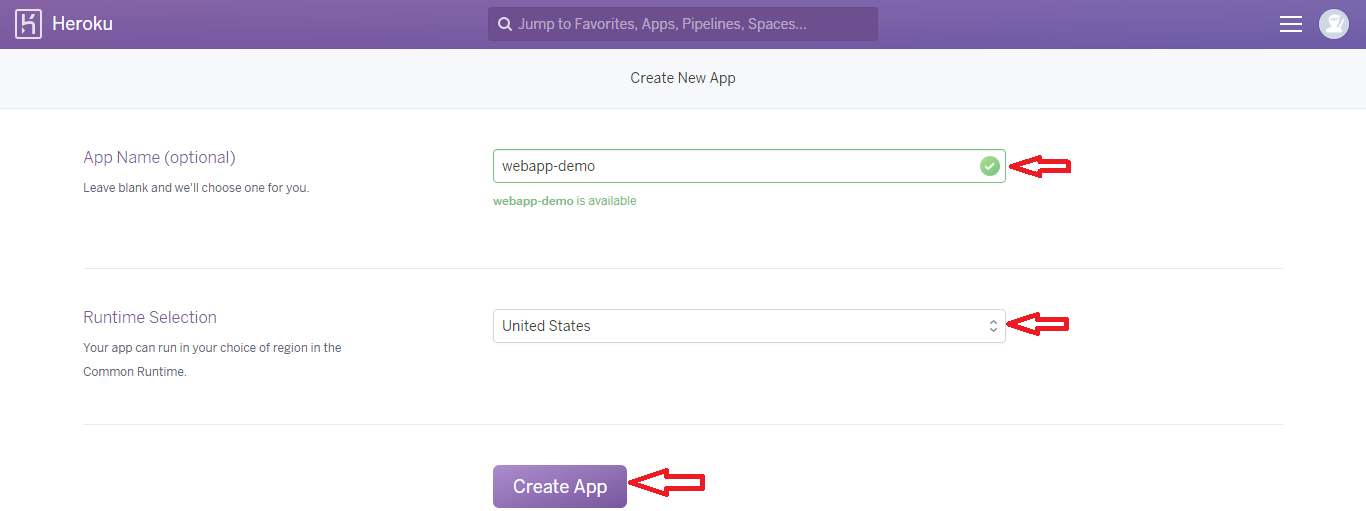
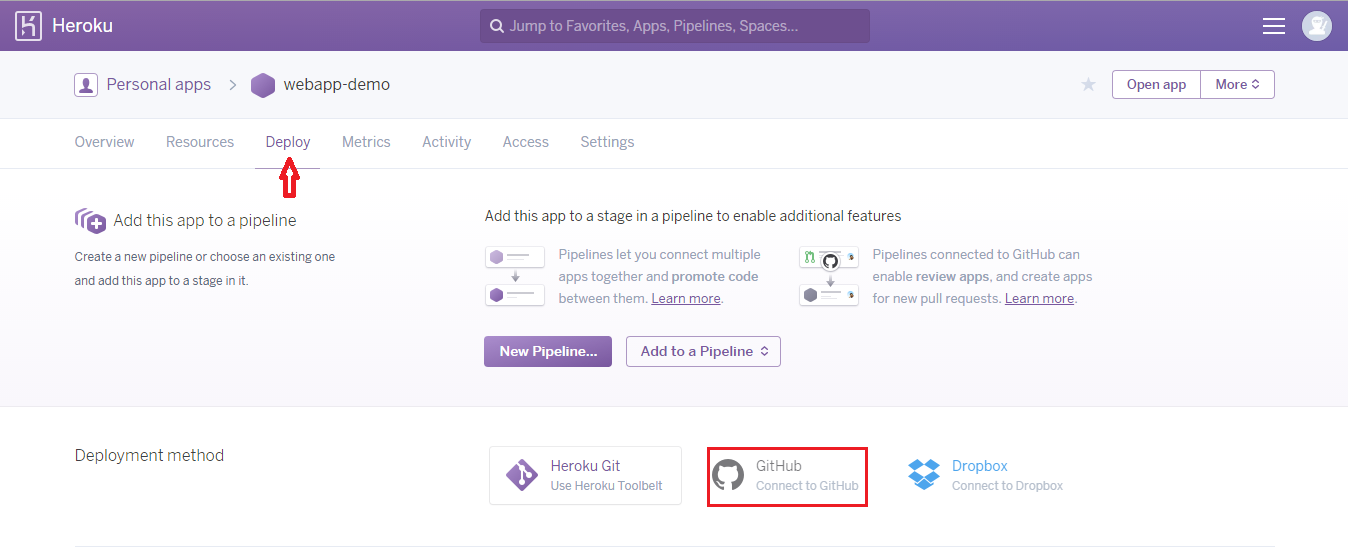
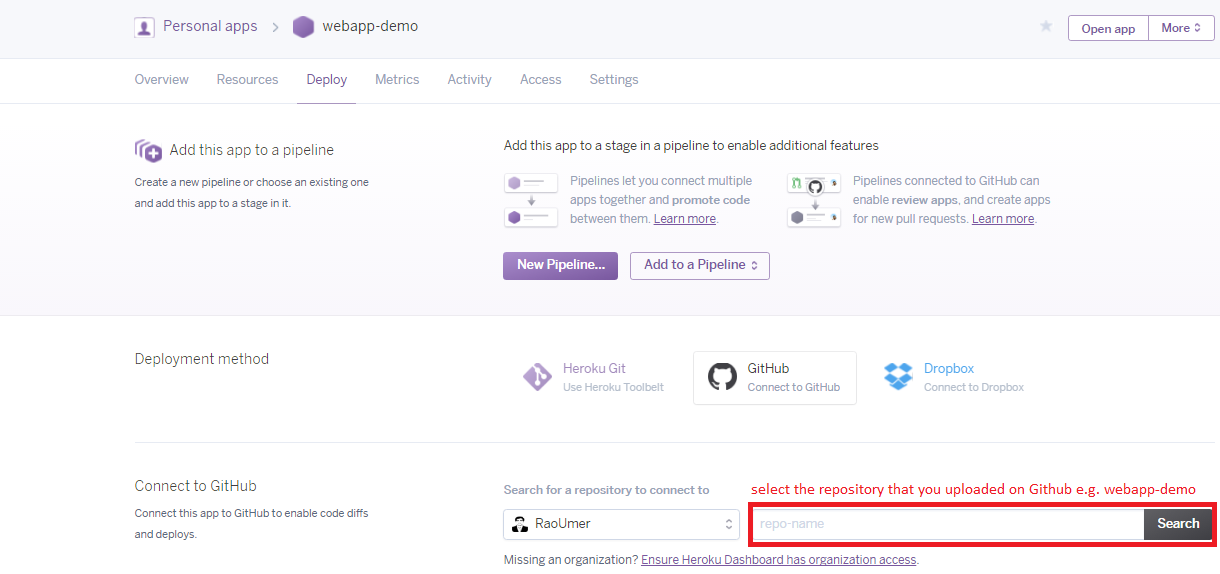
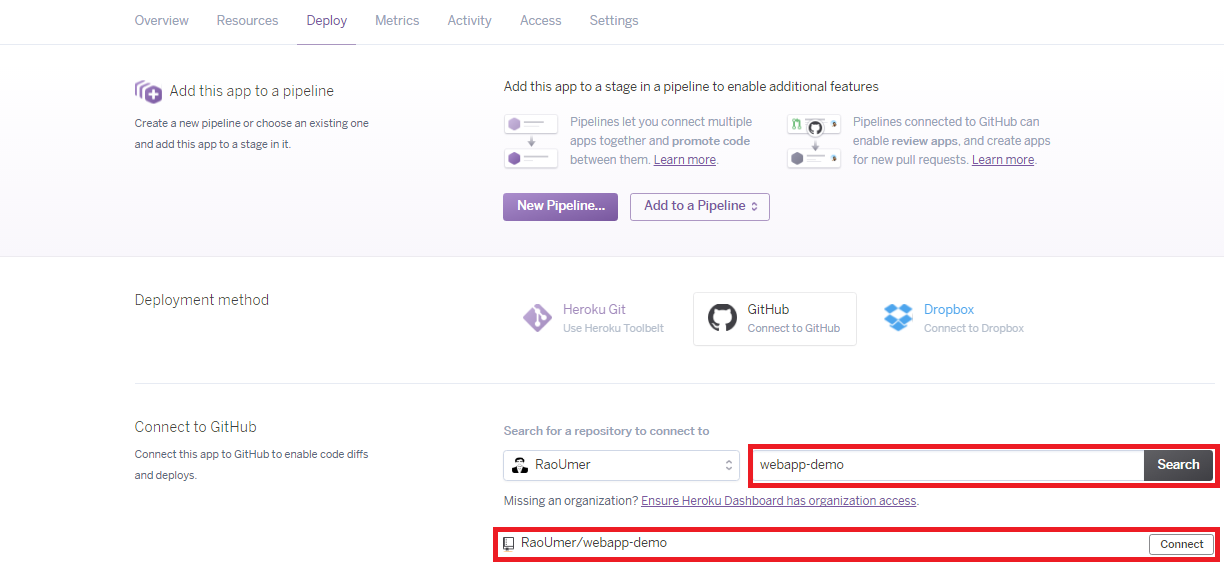
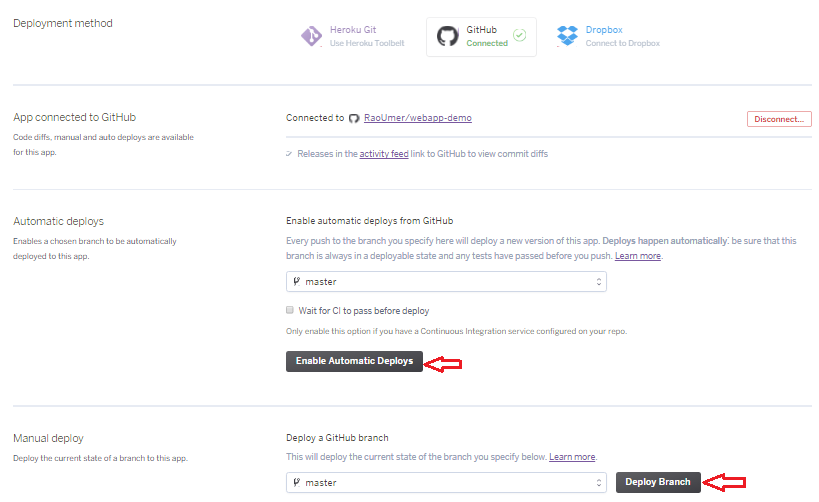
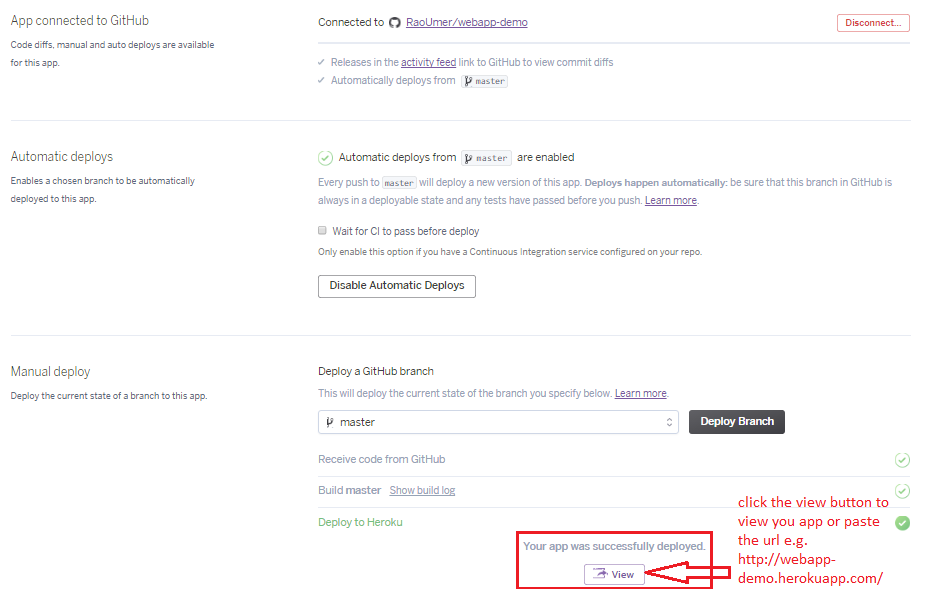
Rather than compiling from source, Conda installs from binaries, which can be noticeably faster, especially when pushing a build to Heroku. Luckily all we have to do to take advantage of Conda is add the buildpack:
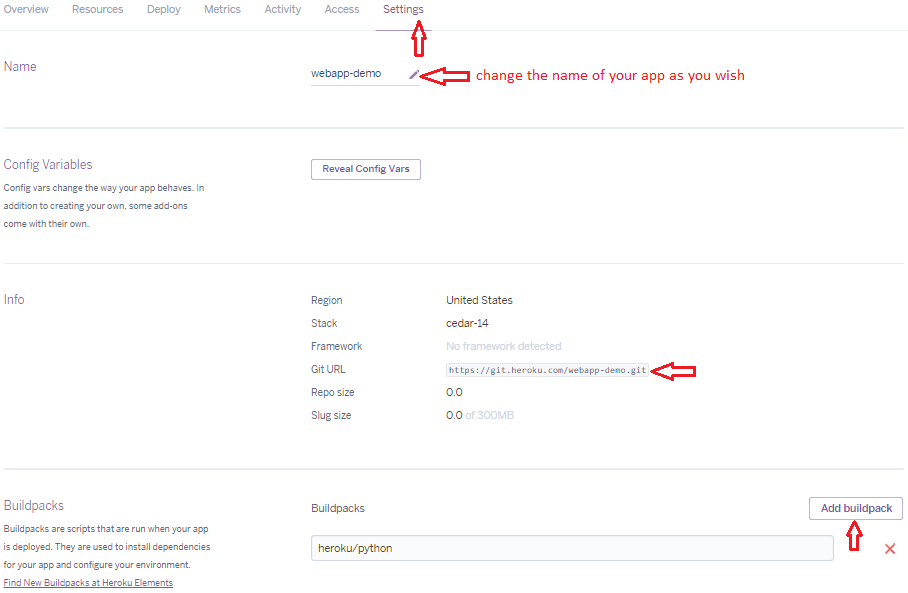
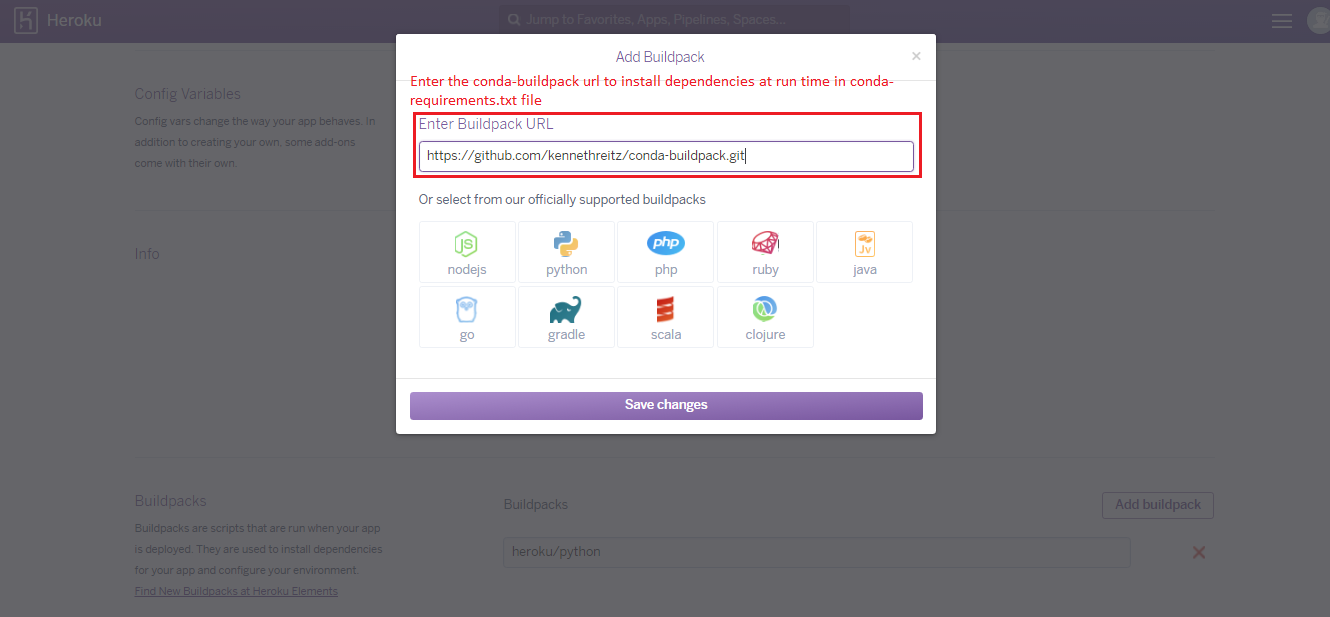


and add a conda-requirements.txt to handle the install dependencies. Not everything can be installed with Conda, so we still need a requirements.txt file to instruct pip to take care of the rest.
Finally, for hosting the app on Heroku, port 33507 is reserved for Flask and that worked well for us:
	if __name__ == '__main__':
		app.run(port=33507)
It’s often useful to run the app locally in order to iterate rapidly through changes, by pointing your web browser at localhost:33507. However, if you’re developing on a cloud server like Digital Ocean where you can’t do that, you can make the app publicly available by using app.run(host='0.0.0.0'). Just be careful not to have debug mode on when you do this, as it will allow anyone on the internet to execute arbitrary code on your computer.
Heroku and Git already have tight integration. The another way to deploy your webapp is to Heroku Git (by installing Heroku toolbelt on local machine).Once all the pieces are in place, deploying is as simple as:
	git init
	git add .
	git commit -m 'initial commit'
	heroku login
	heroku create cleverappname
	git push heroku master
and voila, your app is live at https://cleverappname.herokuapp.com!
I hope, you will enjoy to read this post. Please, feel free to add comments about your queries, I would like to answers them.
This article was originally published as a blog post on The Data Incubator, which can be found here.